
Origami samurai helmet (kabuto): step-by-step guide
Learn to fold the origami samurai helmet (kabuto) with animated steps, a paper size calculator, common mistakes and the history of this classic model.
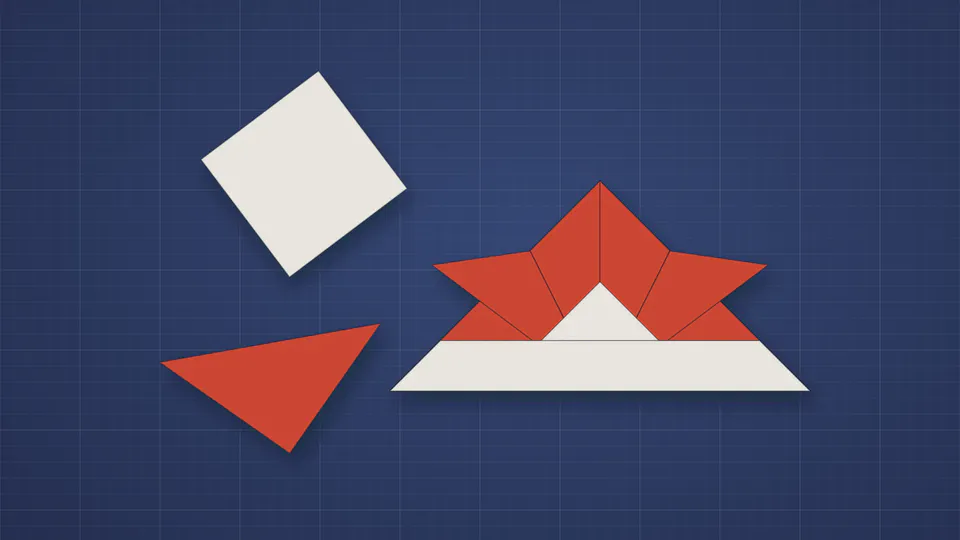
The origami samurai helmet, or kabuto, is folded from a single square of paper with no glue and no scissors. It takes seven simple folds and about five minutes. It is also one of the best-known traditional models in Japan: Japanese children fold kabuto out of newspaper and wear them on Children’s Day, May 5.
The interactive tutorial is right below. Each fold is animated on screen, with the fold line and an arrow showing where the paper goes. You can move forward, go back, replay a fold or drag the slider to make the movement slowly. After the tutorial you’ll find the details that usually go wrong, a calculator for the right paper size if you want to wear the helmet, and the history of the model.
| Model card | |
|---|---|
| Difficulty | Easy, a good first origami |
| Folds | 7 (all valley folds except the last) |
| Time | 3 to 5 minutes |
| Paper | 1 square, any size |
| Finished size | About 71% of the paper’s side, in width |
Interactive kabuto tutorial
Interactive tutorial
Get your square ready
Use a square sheet. Place the white side (or the side you want inside the helmet) facing up and turn the paper so it stands on a corner, like a diamond.
Tip No square paper? Fold one corner of a letter or A4 sheet to the opposite edge, crease, and cut off the extra strip.
Fold it into a triangle
Bring the top corner down to the bottom corner, folding the paper in half. Line the two corners up exactly, then crease the horizontal fold.
Tip Run a fingernail along the crease. Sharp folds make a sturdier helmet.
Bring the side corners down
Fold the left and right corners down to the bottom point. The triangle becomes a smaller diamond with a slit down the middle.
Tip The edges of the two flaps should meet at the center line, without overlapping or leaving a gap.
Fold the flaps back up
Now fold only the two flaps you just made: take their bottom points up to the top point. The crease runs along the middle of the diamond.
Tip The back layer (the big diamond) stays put. Hold it down with your other hand.
Make the horns
Fold the tip of each flap outward on a diagonal, starting from the middle of the bottom edge. These tips become the helmet's decorative horns.
Tip The angle is up to you: the wider the horns, the bolder the kabuto. Keep both sides matching.
Fold the front point up
Take only the front layer of the bottom point and fold it up until it sits a little below the top of the helmet.
Tip Leave the back layer where it is. You will fold it in the last step.
Fold the band up again
Fold the same layer up once more, right along the base of the horns. This band becomes the brim of the helmet.
Tip Use the lower edge of the horns as a ruler and crease firmly. This band holds the model together.
Tuck the back point in
One triangle is left on the back layer. Fold it backward (a mountain fold) on the same line or, better, tuck it inside the helmet.
Tip Tucking it inside makes the helmet sturdier and leaves a clean finish with no loose point.
Open it up
Open the bottom with your fingers to give it some volume. The kabuto stands on its own and, folded from a big sheet, fits on a head.
Tip To wear it as a hat, work out the paper size with the calculator further down this page.
Shortcuts: with the tutorial selected, the ← and → arrow keys change steps. On a phone, swipe across the paper.
If you have never read an origami diagram, you only need two symbols here. A dashed line is a valley fold: the paper folds toward you and the crease forms a V. A dash-and-dot line is a mountain fold: the paper goes behind and the crease forms a peak. The kabuto uses a single mountain fold, in the last step.
What you need
Just a square of paper. Its size decides what your kabuto becomes: a table decoration, a party favor or a hat.
| Paper | Side of the square | Best for |
|---|---|---|
| Origami paper (kami) | 6 in (15 cm) | Decoration and a first try. The most common pack size. |
| Letter or A4 paper, trimmed | 8.5 in (21.6 cm) | A helmet about 6 in wide. Good for kids, because the paper is stiff. |
| Kraft or wrapping paper | 16 to 24 in (40 to 60 cm) | A helmet to wear. Kraft paper holds its shape well. |
| Newspaper | 20 to 24 in (50 to 60 cm) | The traditional way to fold a wearable kabuto in Japan. |
The Japan Society, a British organization devoted to Japanese culture, suggests a square of about 60 cm (24 in) of newspaper or sugar paper for a helmet large enough to wear.
To make a square from a rectangular sheet, fold one top corner down to the opposite edge to form a triangle, crease it, and cut off the leftover strip. When you open it, the sheet already has the diagonal crease. That’s fine: it is the same line as your first fold.
Which side of the paper faces up
Start with the white side up (or the side you want inside the helmet). That way the outside of the helmet ends up colored. Most diagrams use this orientation, including the one from Tuttle Publishing, which tells you to begin with the minor color side facing up.
The folds in more detail
The animation shows the movement, but a few details don’t show on screen. These are the places worth slowing down.
Folds 1 and 2: the base of the helmet
The first fold, which turns the square into a triangle, sets up the whole helmet. If the corners don’t line up, every later fold inherits the error and the horns come out crooked. Line up the two corners, pin them with a finger, and only then crease from the center outward.
In the second fold, the side corners come down to the bottom point. The inner edges of the two flaps should meet exactly at the center. If one flap overlaps the other, unfold and adjust: a millimeter here turns into a shorter horn later on.
Folds 3 and 4: the horns
In the third fold, only the flaps go up. The big diamond behind them stays still. A good trick is to tilt the model slightly in your hand and hold the back layer with your thumb while you fold the flaps.
The fourth fold is the freest in the model. The crease starts at the middle of each flap’s bottom edge and runs diagonally outward. There is no single correct angle: in the animated tutorial the horns spread on a diagonal, but you can make them more upright or wider. What matters is that both sides match. Fold one, then use it as a guide for the other.
These horns echo the kuwagata, the V-shaped crests that some samurai helmets wore at the front.
Folds 5 and 6: the front band
This is where most people slip. In the fifth fold, only the front layer of the bottom point goes up. Separate the two layers with a fingernail before folding. The point stops a little below the top of the helmet; it doesn’t need to be exact.
In the sixth fold, the same layer goes up again, this time exactly along the base of the horns. It forms the band that holds the whole model together. Crease it hard: if this fold is loose, the helmet springs open on its own.
Fold 7: finishing
One triangle is left on the back layer. You have two options: fold it behind on the same line (the tutorial shows this as a mountain fold), or tuck it inside the helmet, between the layers. Tucking takes a bit more effort but gives a sturdier model with no loose point. For a helmet you plan to wear, tuck it.
To finish, open the bottom with your fingers. The kabuto gains volume and stands on its own on the table.
Why the band and front triangle turn out white
If you used paper colored on one side only, you’ll notice that the front band and the small middle triangle show the back color. That’s not a mistake. Every time a layer is folded over itself, it shows the other side of the paper. The front layer starts out colored (after the first fold), turns white in the fifth fold, and the part that goes up in the sixth fold shows its white side again. The animation works this out layer by layer, which is why the model on screen matches the one in your hands.
Plenty of people like this contrast because it highlights the helmet’s band. If you want a single-color kabuto, use paper colored on both sides, such as duo paper, kraft paper or newspaper.
What size paper to use for a wearable kabuto
For the helmet to fit a head, what matters is the distance around it once you open it. Measured on the folded model, the kabuto’s width is about 71% of the paper’s side (the side divided by the square root of 2). Since the opening is the width of the front plus the width of the back, the distance around comes to about 1.41 times the side of the paper.
The calculator below does this math both ways. Enter a head circumference to get the paper size, or enter the side of your paper to see how big the helmet will be. For wearing, it adds 25% of slack, because paper doesn’t stretch and the helmet has to go on without tearing.
Calculator: paper size
Result
- Paper
- -
- Helmet width
- -
- Height (without horns)
- -
- Opening (around)
- -
Measure the head with a soft tape just above the ears. The result already adds 25% of slack so the helmet goes on without tearing.
For reference, here are the approximate sizes of a finished kabuto for common sheet sizes:
| Side of the paper | Kabuto width | Height without horns | Opening (around) |
|---|---|---|---|
| 6 in (15 cm) | 4.2 in | 2.1 in | 8.5 in |
| 8.5 in (trimmed letter) | 6.0 in | 3.0 in | 12.0 in |
| 12 in (30 cm) | 8.5 in | 4.2 in | 17.0 in |
| 16 in (41 cm) | 11.3 in | 5.7 in | 22.6 in |
| 20 in (51 cm) | 14.1 in | 7.1 in | 28.3 in |
| 24 in (61 cm) | 17.0 in | 8.5 in | 33.9 in |
These are measurements of a carefully folded model. In practice the folds use up a little paper, so the real result can be slightly smaller. Before cutting a large sheet of expensive paper, try a newspaper sheet of the same size first.
Common mistakes and how to fix them
- The horns are different sizes. This almost always comes from the second fold, where one flap crossed the center line. Unfold back to that step and adjust.
- The front band took the back layer with it. That happens in the fifth fold. Undo it and separate the layers before folding.
- The helmet keeps opening. The sixth fold is loose or the back triangle is not secured. Crease the band again and tuck the back triangle inside.
- The paper tore at a point. Very thin papers, like tissue, tear at the points where several layers meet. Use origami paper, printer paper or kraft paper instead.
- The kabuto won’t stand up. Open the base wider by pushing out from the inside with two fingers.
- Newspaper won’t fold straight. Newspaper has a grain. If the crease comes out wavy, make it in stages and press it with the edge of a ruler.
Folding a kabuto with kids
The kabuto is one of the first origami models taught to children in Japan, precisely because each fold takes a point to another point or to a line you can see. A few ideas to make the activity work:
- Cut the squares in advance. That way nobody needs scissors and the activity goes straight to folding.
- Use large paper. Sheets of 8 to 12 inches are easier for small hands than 6-inch origami paper.
- Fold together, at the same pace. Show each fold in the animated tutorial, wait for everyone to finish, then move on. The replay button helps anyone who fell behind.
- Help with folds 5 and 6. Separating the front layer is the hardest step for young children.
- Let them decorate. Drawing a family crest (mon) on the front or adding stickers turns the model into something personal.
With newspaper squares of about 20 inches, every child leaves the activity with a samurai hat to wear.
The history of the paper kabuto
Kabuto is the Japanese word for the helmet worn by samurai. Besides protecting the head, it displayed the warrior’s identity and rank, and many had crests at the front, like the V-shaped horns that inspire the fourth fold of the paper model.
The origami kabuto is much older than the word origami itself. The Public Paperfolding History Project, run by British designer and researcher David Mitchell, collects records of the model in Japanese prints and books. A print attributed to Utagawa Hiroshige, from around 1830 to 1844, shows a paper kabuto lying on the floor. The model appears in kindergarten material from the Tokyo Women’s Normal School in 1878 and in Japanese school books from the early 20th century. In 1931 Isao Honda included its diagrams in Origami, and in 1957 it reached English-speaking readers as “A Samurai Helmet”.
The helmet also traveled west under other names. In France it appeared in 1901 as La Coiffure aux plumes de paon (the peacock feather hat). The magician Harry Houdini published it in 1922 in his book Paper Magic, as “The Chapeau”, noting that it was Japanese in origin.
The kabuto and Children’s Day
In Japan, May 5 used to be Tango no Sekku, the boys’ festival. In 1948 the Japanese government made the date a national holiday called Kodomo no Hi, Children’s Day, to include all children. It closes Golden Week, the run of Japanese holidays between late April and early May.
Around that time, many families set up gogatsu ningyo at home: warrior dolls and miniature armor and helmets that express the wish for children to grow up strong and brave. According to Wikipedia, the custom of displaying miniature armor and kabuto dates back to the Kamakura and Muromachi periods, and ordinary households began to display paper kabuto. Today, as the Japan Society describes, children fold origami kabuto to wear on the holiday, alongside the carp streamers (koinobori) flying across the country.
Variations
- Taller horns. In the fourth fold, tilt the crease so the horns stand almost upright. The helmet looks taller and bolder.
- Two-tone kabuto. Use paper with a different color on each side. The band and front triangle will show the second color.
- Newspaper helmet and sword. In Japan, it’s common to fold a newspaper kabuto together with a rolled newspaper sword for Children’s Day play.
- May decoration. Folded from 6-inch paper, the kabuto makes a table decoration or a card. Glue the folded model to a card folded in half and write your message inside.
Frequently asked questions
Which side of the paper should face up at the start?
The white side, or whichever side you want inside the helmet. That way the outside comes out colored. The band and front triangle will show the back of the paper, as explained above.
Can I make a kabuto with printer paper?
Yes. Make an 8.5-inch square by folding one corner to the opposite edge and cutting off the extra. The kabuto ends up about 6 inches wide, nice as a decoration but too small to wear.
What size paper fits an adult’s head?
It depends on the head, which is why the calculator above exists. For a head that measures 22.5 inches (57 cm) around, for example, it suggests a square of about 20 inches (51 cm). A double sheet of newspaper cut square is usually enough.
Do I need glue or scissors?
No. The kabuto holds together with folds alone. You only need scissors if you have to cut the paper into a square.
Is the origami kabuto the same as a newspaper pirate hat?
No. The pirate hat (or soldier’s hat) starts from a rectangle folded in half and follows a different sequence. The kabuto starts from a square folded on the diagonal and has horns at the front.
How do I store a kabuto without ruining it?
Close the base and flatten the model, the way it was before the last step. You can keep it between the pages of a book and open it again later.
Sources
- The Public Paperfolding History Project: The Kabuto or Japanese Helmet
- The Japan Society: Origami Instructions: Kabuto Helmet (PDF) and Let’s celebrate Children’s Day
- Japanese Cultural Center of Hawaii: Kodomo no Hi
- Tuttle Publishing: Samurai Helmet folding instructions (PDF)
- Wikipedia: Children’s Day (Japan)